The Visual Module of VPython - Reference Manual
Date de publication : 4 février 2009
Windows/Events/Files
Windows
Mouse Events
Mouse Click
Mouse Drag
Keyboard Events
Button and Sliders
Reading/Writing Files
Windows/Events/Files
Windows
Controlling One or More Visual Display Windows
Initially, there is one Visual display window named scene. Display objects do not create windows on the screen unless they are
used, so if you immediately create your own display object early in your program you will not need to worry about scene. If you
simply begin creating objects such as sphere they will go into scene.
display() Creates a display with the specified attributes, makes it the selected display, and returns it. For example, the
following creates another Visual display window 600 by 200, with its upper left corner at the upper left corner of the screen
(y is measured down from the top of the screen), with 'Examples of Tetrahedrons' in the title bar, centered on location (5,0,0),
and with a background color of cyan filling the window.
scene2 = display(title='Examples of Tetrahedrons',
     x=0, y=0, width=600, height=200,
     center=(5,0,0), background=(0,1,1))
|
General-purpose options
select() Makes the specified display the "selected display", so that objects will be drawn into this display by default; e.g.
scene.select()
Executing myscene = display.get_selected() returns a reference to the display in which objects are currently being created.
foreground Set color to be used by default in creating new objects such as sphere; default is white.
Example: scene.foreground = (1,0,0)
background Set color to be used to fill the display window; default is black.
ambient Color of nondirectional ("ambient") lighting. Default is color.gray(0.2); for compatibility with earlier versions of
Visual, this can be expressed as scene.ambient=0.2. Also see the following lights attribute.
lights List of light objects created for this display. By default, a display has two distant lights:
distant_light(direction=(0.22, 0.44, 0.88), color=color.gray(0.8)) and
distant_light(direction=(-0.88, -0.22, -0.44), color=color.gray(0.3)).
These are equivalent to the default lights in Visual prior to version 5. You can get rid of these default lights with
scene.lights = []. The color of light objects and the amount of scene.ambient must be specified with some care, because if the
total lighting intensity exceeds 1 anywhere in the scene the results are unpredictable. scene.lights is a list of any lights
you have created.
You can create lights that are local, near other objects. The following statement creates a yellow light positioned at (x,y,z),
and if you continually update lamp.pos, the light will move. You may wish to place a sphere or box with
material=materials.emissive at the same location so that the lamp looks like a glowing lamp.
lamp = local_light(pos=(x,y,z), color=color.yellow)
|
A distant red light located in the direction (x,y,z) is created like this:
distant_light(direction=(x,y,z), color=color.red)
|
Previous to Visual version 5, you set up a light by specifying a vector in the direction to the light from the origin,
and the magnitude of the vector was the intensity. For example,
scene.lights = [vector(1,0,0)] with
scene.ambient = 0 will
light the scene with full intensity from the right side, with no ambient lighting on the left. In Visual version 5 and later,
this scheme for specifying lights still works, but it is preferable to create light objects.
To obtain
camera position, see
Mouse Interactions.
objects A list of all the visible objects in the display; invisible objects and lights are not listed (scene.lights is a list
of existing lights). For example, the following makes all visible boxes in the scene red:
for obj in scene2.objects:
if obj.__class__ == box
obj.color = color.red
|
show_rendertime If you set scene.show_rendertime = 1, in the lower left corner of the display you will see something like
"cycle: 27 render: 5", meaning 27 milliseconds between renderings of the scene, taking 5 milliseconds to render, in which
case 22 out of 27 milliseconds were devoted to executing your Python statements.
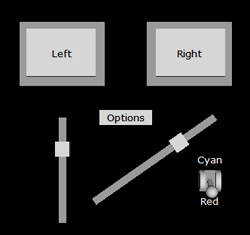
stereo Stereoscopic option; scene.stereo = 'redcyan' will generate a scene for the left eye and a scene for the right eye, to
be viewed with red-cyan glasses, with the red lens over the left eye. (There are also 'redblue' and 'yellowblue' options; note
that objects that were not originally white may be somewhat dim.)
Setting scene.stereo = 'crosseyed' produces side-by-side images which if small enough can be seen in 3D by crossing your eyes
but focusing on the screen (this takes some practice). Setting scene.stereo = 'passive' produces side-by-side images which if
small enough can be seen in 3D by looking "wall-eyed", looking into the far distance but focusing on the screen (this too takes
some practice).
scene.stereo = 'active' will render alternating left eye/right eye images for viewing through shutter glasses if the graphics
system supports quad buffered stereo. If stereo equipment is not available, setting the option has no effect, and scene.stereo
will have the value 'nostereo'. You can also use scene.stereo = 'passive' with quad buffered stereo for display using two
polarized projectors (for stereo viewing using simple passive polarized glasses). (Quad buffered 'active' stereo is only
available on specialised graphics systems that have the necessary hardware and shutter glass connector, such as PCs with CRT
displays and nVidia Quadro graphics cards. It generates the illusion of depth by rendering each frame twice from slightly
different viewpoints corresponding to the left and right eyes. Special shutter glasses are synchronised with the alternating
images so that each eye sees only the matching frame, and your brain does the rest. It's called 'quad buffered' because there
is an OpenGL buffer per eye, both double-buffered for smooth updating. 'Passive' stereo requires a video card that can drive
two monitors, or two projectors.)
cursor.visible By setting scene.cursor.visible = 0, the mouse cursor becomes invisible. This is often appropriate while
dragging an object using the mouse. Restore the cursor with scene.cursor.visible = 1. NOT YET IMPLEMENTED IN VISUAL 5.
Controlling the window
The window attributes x, y, width, height, title, and fullscreen cannot be changed while a window is active; they are used to
create a window, not to change one. If you want to modify any of these window attributes, first make the window invisible, make
the changes, and then make the window visible again. This creates a new window with the new attributes; all existing objects
are still part of the new window.
x, y Position of the window on the screen (pixels from upper left)
width, height Width and height of the display area in pixels: scene.height = 200 (includes title bar).
title Text in the window's title bar: scene.title = 'Planetary Orbit'
fullscreen Full screen option; scene2.fullscreen = 1 makes the display named scene2 take up the entire screen. In this case
there is no close box visible; press Escape to exit.
(There is currently a bug in the fullscreen option for Linux; the Escape key has no effect. If you use the fullscreen option
on Linux, be sure to program a mouse or keyboard input for quitting the program.)
visible Make sure the display is visible; scene2.visible = 1 makes the display named scene2 visible. This is
automatically called when new primitives are added to the display, or the mouse is referenced. Setting visible to 0 hides the
display.
exit If sceneb.exit = 0, the program does not quit when the close box of the sceneb display is clicked. The
default is sceneb.exit = 1, in which case clicking the close box does make the program quit.
Controlling the view
center Location at which the camera continually looks, even as the user rotates the position of the camera. If you change
center, the camera moves to continue to look in the same "compass" direction toward the new center, unless you also change
forward (see next attribute). Default (0,0,0).
autocenter scene.center is continuously updated to be the center of the smallest axis-aligned box containing the scene. This
means that if your program moves the entire scene, the center of that scene will continue to be centered in the window.
forward Vector pointing in the same direction as the camera looks (that is, from the current camera location, given by
scene.mouse.camera, toward scene.center). The user rotation controls, when active, will change this vector continuously.
When forward is changed, the camera position changes to continue looking at center. Default (0,0,-1).
fov Field of view of the camera in radians. This is defined as the maximum of the horizontal and vertical fields
of view. You can think of it as the angular size of an object of size range, or as the angular size of the longer axis of the
window as seen by the user. Default pi/3.0 radians (60 degrees).
range The extent of the region of interest away from center along each axis. This is the inverse of scale, so use either range
or scale depending on which makes the most sense in your program. Setting range to 10 is the same as setting it to (10,10,10).
Setting range to (10,0,0) means that scene.center+scene.range will be at the right edge of a square window. A sphere of radius
10 will fill the window. A cubical box whose half-width is 10 will overfill the window, because the front of the box in 3D
appears larger than the xy plane passing through scene.center, unless the field of view is very small.
scale A scaling factor which scales the region of interest into the sphere with unit radius. This is the inverse of range, so
use either range or scale depending on which makes the most sense in your program. Setting scale to 0.1 is the same as setting
it to (0.1,0.1,0.1) or setting range to (10,10,10).
up A vector representing world-space up. This vector will always project to a vertical line on the screen (think of the camera
as having a "plumb bob" that keeps the top of the screen oriented toward up). The camera also rotates around this axis when the
user rotates "horizontally". By default the y axis is the up vector.
There is an interaction between up and forward, the direction that the camera is pointing. By default, the camera points in
the -z direction (0,0,-1). In this case, you can make the x or y axes (or anything between) be the up vector, but you cannot
make the z axis be the up vector, because this is the axis about which the camera rotates when you set the up attribute. If you
want the z axis to point up, first set forward to something other than the -z axis, for example (1,0,0).
autoscale = 0 no automatic scaling (set range or scale explicitly); autoscale = 1 automatic scaling (default). It is often
useful to let Visual make an initial display with autoscaling, then turn autoscaling off to prevent further automated changes.
userzoom = 0 user cannot zoom in and out of the scene
userzoom = 1 user can zoom (default)
userspin = 0 user cannot rotate the scene
userspin = 1 user can rotate (default)
Mouse Events
Mouse Interactions
Introduction
Mouse objects are obtained from the mouse attribute of a display object such as
scene. For example, to obtain mouse input
from the default window created by Visual, refer to
scene.mouse. For basic examples of mouse handling, see
Click example
and
Drag example.
A mouse object has a group of attributes corresponding to the current state of the mouse. It also has functions
getevent()
and
getclick(), which return an object with similar attributes corresponding to the state of the mouse when the user last
did something with the mouse buttons. If the user has not already done something with the mouse buttons,
getevent() and
getclick() will stop program execution until this happens.
Different kinds of mouse
The mouse routines can handle a three-button mouse, with "left", "right", and "middle" buttons. For systems with a two-button
mouse, the "middle" button consists of the left and right buttons pressed together. For systems with a one button mouse, the
right button is invoked by holding down the Command key, and the middle button is invoked by holding down the Option key.
Current state of mouse
pos The current 3D position of the mouse cursor;
scene.mouse.pos. Visual always chooses a point in the plane parallel to the
screen and passing through
display.center. (See Projecting mouse information onto a given plane for other options.)
button = None (no buttons pressed), 'left', 'right', 'middle', or 'wheel' (scroll wheel pressed on some Windows mouses).
Example:
scene.mouse.button == 'left' is true if the left button is currently down.
pick The nearest object in the scene which falls under the cursor, or None. At present only spheres, boxes, cylinders, and
convex can be picked. The picked object is
scene.mouse.pick.
pickpos The 3D point on the surface of the picked object which falls under the cursor, or None;
scene.mouse.pickpos.
camera The read-only current position of the camera as positioned by the user,
scene.mouse.camera. For example,
mag(scene.mouse.camera-scene.center) is the distance from the center of the scene to the current position of the camera.
If you want to set the camera position and direction by program, use
scene.forward and
scene.center, described in
Controlling Windows.
ray A unit vector pointing from camera in the direction of the mouse cursor. The points under the mouse cursor are exactly
{
camera + t*ray for
t>0}.
The
camera and
ray attributes together define all of the 3D points under the mouse cursor.
project() Projects position onto a plane. See Projecting mouse position onto a given plane.
alt = 1 if the ALT key is down, otherwise 0
ctrl = 1 if the CTRL key is down, otherwise 0 (for a one-button mouse, meaningful only if mouse buttons up)
shift = 1 if the SHIFT key is down, otherwise 0 (for a one-button mouse, meaningful only if mouse buttons up)
Getting events
There are five kinds of mouse events: press, click, drag, drop, and release:
- A press event occurs when a mouse button is depressed.
- A click event occurs when all mouse buttons are released with no or very slight movement of the mouse.
Note that a click event happens when the mouse button is released. See Click example.
- A drag event occurs when the mouse is moved slightly after a press event, with mouse buttons still down.
This can be used to signal the beginning of dragging an object. See Drag example.
- A drop event occurs when the mouse buttons are released after a drag event.
- A release event occurs when the mouse buttons are released after a click or drag event.
Between a drag event (start of dragging) and a drop event (end of dragging), there are no mouse events but you can examine
the continuously updated position of the mouse indicated by
scene.mouse.pos. Here is how to tell that an event has happened,
and to get information about that event:
events The number of events (press, click, drag, or drop) which have been queued; e.g.
scene.mouse.events.
scene.mouse.events = 0 may be used to discard all input. No value other than zero can be assigned.
getevent() Obtains the earliest mouse event and removes it from the input queue. If no events are waiting in the queue (that
is, if
scene.mouse.events is zero),
getevent() waits until the user enters a mouse event (press, click, drag, or drop).
getevent() returns an object with attributes similar to a mouse object:
pos,
button,
pick,
pickpos,
camera,
ray,
project(),
alt,
ctrl, and
shift. These attributes correspond to the state of the mouse when the event took place. For example, after
executing
mm = scene.mouse.getevent() you can look at the various properties of this event, such as
mm.pos,
mm.pick,
mm.drag
(see below), etc.
If you are interested in every type of event (press, click, drag, and drop), you must use
events and
getevent().
If you are only interested in left click events (left button down and up without significant mouse movement), you can use
clicked and
getclick():
clicked The number of left clicks which have been queued; e.g.
scene.mouse.clicked.
This does not include a count of nonclick events (press, drag, or drop).
getclick() Obtains the earliest mouse left click event (pressing the left button and releasing it in nearly the same position)
and removes it from the input queue, discarding any earlier press, drag, or drop events. If no clicks are waiting in the queue
(that is, if
scene.mouse.clicked is zero),
getclick() waits until the user clicks. Otherwise
getclick() is just like
getevent().
It is a useful debugging technique to insert
scene.mouse.getclick() into your program at a point where you would like to
stop temporarily to examine the scene. Then just click to proceed.
Additional information obtained with getevent() or getclick()
In addition to the information available with
scene.mouse,
getevent() and
getclick() furnish this additional information:
press = 'left' for a press event, or None ('right' or 'middle' not currently implemented)
click = 'left' for a click event, or None ('right' or 'middle' not currently implemented); in this case
pos and other
attributes correspond to the state of the mouse at the time of the original press event, so as not to lose initial position
information. See
Click example.
drag = 'left' for a drag event, or None ('right' or 'middle' not currently implemented); in this case
pos and other
attributes correspond to the state of the mouse at the time of the original press event, so as not to lose initial position
information. See
Drag example.
drop = 'left' for a drop event, or None ('right' or 'middle' not currently implemented)
release = 'left' following click and drop events, indicating which button was released, or None ('right' or 'middle'
not currently implemented)
Projecting mouse position onto a given plane
Here is a way to get the mouse position relative to a particular plane in space:
temp = scene.mouse.project(normal=(0,1,0), point=(0,3,0))
if temp:
ball.pos = temp
|
This projects the mouse cursor onto a plane that is perpendicular to the specified normal. If point is not specified,
the plane passes through the origin. It returns a 3D position, or None if the projection of the mouse misses the plane.
In the example shown above, the user of your program will be able to use the mouse to place balls in a plane parallel to
the xy plane, a height of 3 above the xy plane, no matter how the user has rotated the point of view.
You can instead specify a perpendicular distance d from the origin to the plane that is perpendicular to the specified
normal. The example above is equivalent to
temp = scene.mouse.project(normal=(0,1,0), d=3)
|
Mouse Click
Click Example
This program displays a box (which automatically creates a window referred to as scene), then repeatedly waits for a mouse left
click, prints the mouse position in the Python shell window,, and displays a cyan sphere. A mouse click is defined as pressing
and releasing the left mouse button with almost no motion of the mouse, so the sphere appears when you release the mouse button.
from visual import *
scene.range = 4
box()
while 1:
if scene.mouse.clicked:
m = scene.mouse.getclick()
loc = m.pos
print loc
sphere(pos=loc, radius=0.2, color=color.cyan)
|
Copy this program into an IDLE window and run the program. Click outside the box and a cyan sphere appears where you click.
If you click inside the box, nothing seems to happen. This is because the mouse click is in the xy plane, and the sphere is
buried inside the box. If you rotate the scene and then click, you'll see that the spheres go into the new plane parallel to
the screen and passing through scene.center. If you want all of the spheres to go into the xy plane, perpendicular to the z
axis, change the latter part of the program like this:
loc = m.project(normal=(0,0,1))
if loc:
print loc
sphere(pos=loc, radius=0.2, color=color.cyan)
|
Mouse Drag
Drag example
Here is the sequence of mouse events involved in dragging something:
1) m1.press is true when you depress the mouse button (it is 'left' if left button; any quantity that is nonzero is considered
true in Python).
2) m1.drag is true when the mouse coordinates change from what they were at the time of m1.press.
At the time of the drag event, the mouse position is reported to be what it was at the time of the press event, so that the
dragging can start at the place where the user first clicked. If the mouse is in motion at the time of the press event, it
is quite possible that the next position seen by the computer, at the time of the drag event, could be quite far from the click
position. This is why the position of the drag event is reported as though it occurred at the press location.
3) No events occur while dragging; you continually use scene.mouse.pos to update what you're dragging.
4) m1.drop is true when you release the mouse button.
You can program dragging with the mouse simply by continually reading the current value of scene.mouse.pos. Here is a complete
routine for dragging a sphere with the left button down. Copy this into an edit window and try it!
from visual import *
scene.range = 5
ball = sphere(pos=(-3,0,0), color=color.cyan)
cube = box(pos=(+3,0,0), size=(2,2,2), color=color.red)
pick = None
while 1:
if scene.mouse.events:
m1 = scene.mouse.getevent()
if m1.drag and m1.pick == ball:
drag_pos = m1.pickpos
pick = m1.pick
elif m1.drop:
pick = None
if pick:
new_pos = scene.mouse.project(normal=(0,0,1))
if new_pos != drag_pos:
pick.pos += new_pos - drag_pos
drag_pos = new_pos
|
If you do a lot of processing of each mouse movement, or you are leaving a trail behind the moving object, you may need to
check whether the "new" mouse position is in fact different from the previous position before processing the "move", as is
done in the example above. For example, a trail drawn with a curve object that contains a huge number of points all at the
same location may not display properly.
Most VPython objects can be "picked" by clicking them. Here is a more general routine which lets you drag either the tail or
the tip of an arrow. Copy this into an edit window and try it!
from visual import *
scene.range = 8
arr = arrow(pos=(2,0,0),axis=(0,5,0))
by = 0.3
drag = None
while 1:
if scene.mouse.events:
m1 = scene.mouse.getevent()
if m1.press:
if mag(arr.pos-m1.pos) <= by:
drag = 'tail'
elif mag((arr.pos+arr.axis)-m1.pos) <= by:
drag = 'tip'
drag_pos = m1.pos
elif m1.drop:
drag = None
if drag:
new_pos = scene.mouse.pos
if new_pos != drag_pos:
displace = new_pos - drag_pos
drag_pos = new_pos
if drag == 'tail':
arr.pos += displace
else:
arr.axis += displace
|
Keyboard Events
Keyboard Interactions
If scene.kb.keys is nonzero, one or more keyboard events have been stored, waiting to be processed.
Executing key = scene.kb.getkey() obtains a keyboard input and removes it from the input queue. If there are no events
waiting to be processed, getkey() waits until a key is pressed.
If len(key) == 1, the input is a single printable character such as 'b' or 'B' or new line ('\n') or tab ('\t'). Otherwise
key is a multicharacter string such as 'escape' or 'backspace' or 'f3'. For such inputs, the ctrl, alt, and shift keys are
prepended to the key name. For example, if you hold down the shift key and press F3, key will be the character string
'shift+f3', which you can test for explicitly. If you hold down all three modifier keys, you get 'ctrl+alt+shift+f3';
the order is always ctrl, alt, shift.
Multicharacter names include delete, backspace, page up, page down, home, end, left, up, right, down, numlock, scrlock, f1,
f2, f3, f4, f5, f6, f7, f8. Windows and Linux also have f9, f11, f12, insert.
Here is a test routine that lets you type text into a label:
from visual import *
prose = label()
while 1:
if scene.kb.keys:
s = scene.kb.getkey()
if len(s) == 1:
prose.text += s
elif ((s == 'backspace' or s == 'delete') and
len(prose.text)) > 0:
prose.text = prose.text[:-1]
elif s == 'shift+delete':
prose.text = ''
|
Note that
mouse events also provide information about the ctrl, alt, and shift keys, which may be used to modify mouse actions.
Controls: buttons, sliders, toggles, and menus
You can create buttons, sliders, toggle switches, and pull-down menus to control your program. You import these capabilities
with this statement:
from visual.controls import *
Importing from visual.controls makes available all Visual objects plus the controls module. To use the control features,
you create a special controls window and add control objects to that window, specifying what actions should take place when
the controls are manipulated. For example, an action associated with a button might be the execution of a function to change
the color of a Visual object. After creating the controls, you repeatedly call an interact routine to check for user
manipulation of the controls, which trigger actions. For a detailed example, see the VPython demo program controlstest.py.
Here is a small example. All it does is change the button text when you click the button. The Python construction "lambda:"
is required for the controls module to have the correct context ("namespace") for calling the specified routine.
from visual.controls import *
def change():
if b.text == 'Click me':
b.text = 'Try again'
else:
b.text = 'Click me'
c = controls()
b = button( pos=(0,0), width=60, height=60,
text='Click me', action=lambda: change() )
while 1:
c.interact()
|
Controls window
controls() Creates a controls window with the specified attributes, and returns it. For example, the following creates a
controls window 300 by 300, located at (0,400) with respect to the upper left corner of the screen, with 'Controlling the
Scene' in the title bar, and a range of 50 (window coordinates from -50 to +50 in x and y):
c = controls(title='Controlling the Scene',
     x=0, y=400, width=300, height=300, range=50)
|
Controls window parameters
x, y Position of the window on the screen (pixels from upper left)
width, height Width and height of the display area in pixels.
title Text in the control window's title bar.
range The extent of the region of interest away from the center along each axis. The default is 100. The center
of a controls window is always (0,0).
display Every controls window has the attribute display; sphere(display=c.display) will place a sphere in the controls
window named c.
Control objects
After creating a controls window, you can create the following control objects that will appear in that window:
button A button to click.
slider Drag a slider to enter a numeric value graphically.
toggle Click on the handle to flip a toggle switch.
menu A pull-down menu of options.
Control objects have the following attributes:
pos Position of the control (center of button or toggle, one end of slider, upper left corner of menu title)
color Gray by default
width Width of button, toggle, or menu
height Height of button, toggle, or menu
axis Axis for slider, pointing from pos to other end (as for cylinder or arrow)
length Length of slider (in direction of axis)
min, max Minimum and maximum values for a slider
value Value of toggle (0 or 1), slider (depends on slider min and max), or menu (the text just selected on
the menu). The value of a toggle or slider (but not a menu) can be set as well as read. If you set the value of a toggle
or slider, the control moves to the position that corresponds to that value.
text Text to display on a button, or the header at the top of a menu
text0 Text to display below a toggle switch (associated with toggle value = 0)
text1 Text to display above a toggle switch (associated with toggle value = 1)
action Specify Python statement to be executed when a control is manipulated
items For menus only, list of menu items to choose from. Here is how to add a menu item to a menu named m1:
m1.items.append( ('Red', lambda: cubecolor(color.red)) )
|
This adds to the pull-down menu an item 'Red' which when chosen will pass the value color.red to the subroutine cubecolor().
The Python construction "lambda:" is required for the controls module to have the correct context ("namespace") for calling
the specified routine.
Reading/Writing Files
Reading and Writing Files
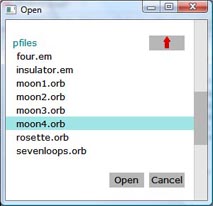
A simple file dialog package is provided in the module visual.filedialog.
Here is how to get a file dialog display to choose a file to read, and then display the contents. The get_file() routine
lets you choose a file, and it returns a file descriptor, a pointer to the chosen file (here the file descriptor has been
named fd). If you cancel the file dialog display, get_file() returns None, which you should check for (the statements just
after the "if fd:" will be executed only if fd is not None). Using the file descriptor you can read the entire file as one
long string, or with readlines() you can read a list of lines of text, each ending with an end-of-line character ('\n').
from visual.filedialog import get_file
fd = get_file()
if fd:
data = fd.read()
fd.close()
print data
|
To choose a file and write data to the chosen file, do this:
from visual.filedialog import save_file
fd = save_file()
if fd:
fd.write("This is a test.\nThis is only a test.")
fd.close()
|
There are other file descriptor functions besides read(), readlines(), write(), and close(); see Python documentation.
For example, fd.name() is the name of the file associated with the file descriptor.
The examples shown above are sufficient for many tasks, but you can customize the file dialog display by specifying parameters
for the get_file() and save_file() functions, as shown here with their default values:
save_file(file_extensions=None, x=100, y=100,
          title="Save", mode='w', maxfiles=20)

get_file(file_extensions=None, x=100, y=100,
          title="Open", mode='rU', maxfiles=20)
|
For example, get_file(file_extensions=['.txt.', '.py']) will display only files ending in these extensions. The parameter
maxfiles specifies the maximum number of files to show on one page, which determines the height of the file dialog display.
The default "universal" file reading mode is 'rU' which converts different kinds of end-of-line markers for Windows, Mac,
and Linux files to the same standard character '\n'. The parameters x and y specify the pixel location of the upper left
corner of the file dialog display, measured from the upper left corner of the computer screen. The title is displayed at
the top of the window.