The Visual Module of VPython - Reference Manual
Date de publication : 4 février 2009
3D objects
arrow
box
cone
convex
curve
cylinder
ellipsoid
faces
frame
helix
label
points
pyramid
ring
sphere
3D objects
arrow
The arrow object has a straight box-shaped shaft with an arrowhead at one end. The following statement will display an arrow
pointing parallel to the x axis:
pointer = arrow(pos=(0,2,1), axis=(5,0,0), shaftwidth=1)
|
The arrow object has the following attributes and default values, like those for cylinders:
pos (0,0,0),
x (0),
y(0),
z(0),
axis (1,0,0),
length (1),
color (1,1,1) which is color.white,
red (1),
green (1),
blue (1),
opacity (1),
material, and
up (0,1,0). As with
box, the
up attribute is significant for arrow because the shaft and head have square cross sections,
and setting the
up attribute rotates the arrow about its axis. Additional arrow attributes:
shaftwidth By default, shaftwidth = 0.1*(length of arrow)
headwidth By default, headwidth = 2*shaftwidth
headlength By default, headlength = 3*shaftwidth
Assigning any of these attributes to 0 makes it use defaults based on the size of the arrow. If
headlength becomes larger than
half the length of the arrow, or the shaft becomes thinner than 1/50 the length, the entire arrow is scaled accordingly.
This default behavior makes the widths of very short arrows shrink, and the widths of very long arrows grow (while displaying
the correct total length). If you prefer that
shaftwidth and
headwidth not change as the arrow gets very short or very long,
set
fixedwidth = 1. In this case the only adjustment that is made is that
headlength is adjusted so that it never gets longer
than half the total length, so that the total length of the arrow is correct. This means that very short, thick arrows look
similar to a thumbtack, with a nearly flat head.
Note that the
pos attribute for cylinder, arrow, cone, and pyramid corresponds to one end of the object, whereas for a box,
sphere, or ring it corresponds to the center of the object.
See description of
Additional Attributes available for all 3D display objects.
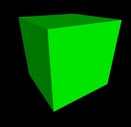
box
In the first diagram we show a simple example of a box object:
mybox = box(pos=(x0,y0,z0), length=L, height=H, width=W)
|
The given position is in the center of the box, at (x0, y0, z0). This is different from cylinder, whose pos attribute is at one
end of the cylinder. Just as with a cylinder, we can refer to the individual vector components of the box as mybox.x, mybox.y,
and mybox.z. The length (along the x axis) is L , the height (along the y axis) is H , and the width is W (along the z axis).
For this box, we have mybox.axis = (L, 0, 0) . Note that the axis of a box is just like the axis of a cylinder.
For a box that isn't aligned with the coordinate axes, additional issues come into play. The orientation of the length of the
box is given by the axis (see second diagram):
mybox = box(pos=(x0,y0,z0), axis=(a,b,c), length=L, height=H, width=W)
|
The axis attribute gives a direction for the length of the box, and the length, height, and width of the box are given as before
(if a length attribute is not given, the length is set to the magnitude of the axis vector).
There remains the issue of how to orient the box rotationally around the specified axis. The rule that Visual uses is to orient
the width to lie in a plane perpendicular to the display "up" direction, which by default is the y axis. Therefore in the
diagram you see that the width lies parallel to the x-z plane. The height of the box is oriented perpendicular to the width,
and to the specified axis of the box. It helps to think of length initially as going along the x axis, height along the y axis,
and width along the z axis, and when the axis is tipped the width stays in the x-z plane.
You can rotate the box around its own axis by changing which way is "up" for the box, by specifying an up attribute for the box
that is different from the up vector of the coordinate system:
mybox = box(pos=(x0,y0,z0), axis=(a,b,c), length=L, height=H, width=W, up=(q,r,s))
|
With this statement, the width of the box will lie in a plane perpendicular to the (q,r,s) vector, and the height of the box
will be perpendicular to the width and to the (a,b,c) vector.
The box object has the following attributes and default values, like those for cylinders:
pos (0,0,0),
x (0),
y(0),
z(0),
axis (1,0,0),
length (1),
color (1,1,1) which is color.white,
red (1),
green (1),
blue (1),
opacity (1),
material, and
up (0,1,0). Additional box attributes:
height In the y direction in the simple case, default is 1
width In the z direction in the simple case, default is 1
size (length, height, width), default is (1,1,1)
mybox.size=(20,10,12) sets length=20, height=10, width=12
Note that the
pos attribute for cylinder, arrow, cone, and pyramid corresponds to one end of the object, whereas for a box,
sphere, or ring it corresponds to the center of the object.
See description of
Additional Attributes available for all 3D display objects.
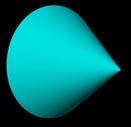
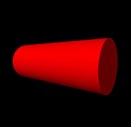
cone
The cone object has a circular cross section and tapers to a point. The following statement will display a
cone with the center of its circular base at (5,2,0), pointing parallel to the x axis with length 12; the
wide end of the cone has radius 1:
cone(pos=(5,2,0), axis=(12,0,0), radius=1)
|
The cone object has the following attributes and default values, like those for cylinders:
pos (0,0,0),
x (0),
y(0),
z(0),
axis (1,0,0),
length (1),
color (1,1,1) which is color.white,
red (1),
green (1),
blue (1),
opacity (1),
material, and
up (0,1,0). As with cylinders,
up has only a subtle effect on the 3D appearance of a cone unless a non-smooth material is
specified. Additional cone attribute:
radius Radius of the wide end of the cone, default = 1
Note that the pos attribute for cylinder, arrow, cone, and pyramid corresponds to one end of the object, whereas for a box,
sphere, or ring it corresponds to the center of the object.
See description of
Additional Attributes available for all 3D display objects.
convex
The convex object takes a list of points for
pos, like the curve object. An object is generated that is everywhere convex
(that is, bulges outward). Any points that would make a portion of the object concave (bulge inward) are discarded. If all
the points lie in a plane, the object is a flat surface.
Currently it is not possible to specify the opacity of a convex object.
See description of
Additional Attributes available for all 3D display objects.
curve
The curve object displays straight lines between points, and if the points are sufficiently close together you get the
appearance of a smooth curve. In addition to its basic use for displaying curves, the curve object has powerful capabilities for
other uses, such as efficient plotting of functions.
Some attributes, such as pos and color, can be different for each point in the curve. These attributes are stored as numpy
arrays. The numpy module for Python provides powerful array processing capabilities; for example, two entire arrays can be
added together. Numpy arrays can be accessed using standard Python rules for referring to the nth item in a sequence (that is,
seq[0] is the first item in seq, seq[1] is the second, seq[2] is the third, etc). For example, anycurve.pos[0] is the position
of the first point in anycurve.
You can give curve an explicit list of coordinates enclosed in brackets, like all Python sequences. Here is an example of a
2D square:
square = curve(pos=[(0,0),(0,1),(1,1),(1,0),(0,0)])
|
Essentially, (1,1) is shorthand for (1,1,0). However, you cannot mix 2D and 3D points in one list.
Curves can have thickness, specified by the radius of a cross section of the curve (the curve has a thickness or diameter
that is twice this radius):
curve(pos=[(0,0,0), (1,0,0), (2,1,0)], radius=0.05)
|
The default radius is 0, which draws a thin curve. A nonzero radius makes a "thick" curve, but a very small radius may make a
curve that is too thin to see.
In the following example, the arange() function (provided by the Python numpy module, which is imported by the Visual module,
gives a sequence of values from 0 to 20 in steps of 0.1 (not including the last value, 20).
c = curve( x = arange(0,20,0.1) )
c.y = sin( 2.0*c.x )
c.z = cos( 2.0*c.x )
|
The x, y, and z attributes allow curves to be used to graph functions easily:
curve( x=arange(100), y=arange(100)**0.5, color=color.red)
|
A function grapher looks like this (a complete program!), where "raw_input" is a Python function that accepts input typed
in the Python Shell window:
eqn = raw_input('Equation in x: ')
x = arange( 0, 10, 0.1 )
curve( x=x, y=eval(eqn) )
|
Parametric graphing is also easy:
t = arange(0, 10, 0.1)
curve( x = sin(t), y = 1.0/(1+t), z = t**0.5, red = cos(t), green = 0, blue = 0.5*(1-cos(t)) )
|
Here are the curve attributes:
pos[] Array of position of points in the curve: pos[0], pos[1], pos[2]....
The current number of points is given by len(curve.pos)
x[ ],
y[ ],
z[ ] Components of pos; each defaults to [0,0,0,0,...]
color[ ] Color of points in the curve
red[ ],
green[ ],
blue[ ] Color components of points in the curve
radius Radius of cross-section of curve
The default radius=0 makes a thin curve
material Material for a thick curve; see
Materials for currently available options
Currently it is not possible to specify the opacity of a curve object.
Adding more points to a curve
Curves can be created incrementally with the
append() function. A new point by default shares the characteristics
of the last point.
spiral = curve( color = color.cyan )
for t in arange(0, 2*pi, 0.1):
    spiral.append( pos=(t,sin(t),cos(t)) )
|
One of the many uses of curves is to leave a trail behind a moving object. For example, if ball is a moving sphere,
this will add a point to its trail:
trail = curve()
ball = sphere()
trail.append(pos=ball.pos)
|
When appending to a curve, you can optionally choose to retain only the last N points, including the one you're adding:
trail.append(pos=ball.pos, retain=50)
|
Interpolation
The curve machinery interpolates from one point to the next. For example, suppose the first three points are red but the fourth
point is blue, as in the following example. The lines connecting the first three points are all red, but the line going from
the third point (red) to the fourth point (blue) is displayed with a blend going from red to blue.
c = curve( pos=[(0,0,0), (1,0,0)], color=color.red)
c.append( pos=(1,1,0) )
c.append( pos=(0,1,0), color=color.blue)
|
If you want an abrupt change in color or thickness, add another point at the same location. In the following example, adding
a blue point at the same location as the third (red) point makes the final line be purely blue.
c = curve( pos=[(0,0,0), (1,0,0)], color=color.red)
c.append( pos=(1,1,0) )
c.append( pos=(1,1,0), color=color.blue)
c.append( pos=(0,1,0) )
|
Technical note: No matter how many points are in a curve, only 1000 are displayed, selected evenly over the full set of points,
in order that the display of a very long curve doesn't slow down unacceptably.
See description of
Additional Attributes available for all 3D display objects.
cylinder
Studying this description of the cylinder object provides an overview of important aspects common to all of the Visual 3D
objects, box, sphere, pyramid, etc.
Here is an example of how to make a cylinder, naming it "rod" for future reference:
rod = cylinder(pos=(0,2,1), axis=(5,0,0), radius=1)
|
The center of one end of this cylinder is at x=0, y=2, and z=1. Its axis lies along the x axis, with length 5, so that the other
end of the cylinder is at (5,2,1), as shown in the accompanying diagram.
You can modify the position of the cylinder after it has been created, which has the effect of moving it immediately to the
new position:
rod.pos = (15,11,9)
rod.x = 15
|
If you create an object such as a cylinder but without giving it a name such as
rod, you can't refer to it later. This doesn't
matter if you never intend to modify the object.
Since we didn't specify a color, the cylinder will be the current "foreground" color (see
Controlling One or More Visual Display Windows). The default foreground color is white. After creating the cylinder, you can change its color:
This will make the cylinder suddenly turn blue, using the so-called RGB system for specifying colors in terms of fractions of
red, green, and blue. (For details on choosing colors, see
Specifying Colors.) You can set individual amounts of red, green,
and blue like this:
rod.red = 0.4
rod.green = 0.7
rod.blue = 0.8
|
The cylinder object can be created with other, optional attributes, which can be listed in any order. Here is a full list of
attributes, most of which also apply to other objects:
pos Position: the center of one end of the cylinder; default = (0,0,0)
A triple, in parentheses, such as (3,2,5)
axis The axis points from pos to the other end of the cylinder, default = (1,0,0)
x,
y,
z Essentially the same as pos.x, pos.y, pos.z, defaults are all 0
radius The radius of the cylinder, default = 1
length Length of axis; if not specified, axis determines the length, default = 1
If length is specified, it overrides the length given by axis
color Color of object, as a red-green-blue (RGB) triple: (1,0,0) is pure red, default = (1,1,1), which is color.white
red,
green,
blue (can set these color attributes individually), defaults are all 1
opacity Opacity of object, default = 1; 0 is completely transparent
material Material of object; see
Materials for currently available options
up Which side of the cylinder is "up"; this has only a subtle effect on the 3D appearance of the cylinder unless
a non-smooth material is specified; default (0,1,0)
Note that the
pos attribute for cylinder, arrow, cone, and pyramid corresponds to one end of the object,
whereas for a box, sphere, or ring it corresponds to the center of the object.
See description of
Additional Attributes available for all 3D display objects.
When you start a VPython program, for convenience Visual creates a display window and names it
scene. By default, objects that
you create go into that display window. See
Controlling One or More Visual Display Windows later in this reference for how you
can create additional display windows and place objects in them.
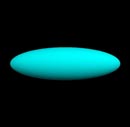
ellipsoid
A long ellipsoid object looks like a cigar; a short one looks like somewhat like a pill. Its cross sections are circles or
ellipses. The elllipsoid object has the same attributes as the box object and it can be thought of as fitting inside a box of
the same dimensions:
myell = ellipsoid(pos=(x0,y0,z0), length=L, height=H, width=W)
|
The given position is in the center of the ellipsoid, at (x0, y0, z0). This is different from cylinder, whose pos attribute is
at one end of the cylinder. Just as with a cylinder, we can refer to the individual vector components of the ellipsoid as
myell.x, myell.y, and myell.z. The length from end to end (along the x axis) is L , the height (along the y axis) is H , and the
width is W (along the z axis). For this ellipsoid, we have myell.axis = (L, 0, 0) . Note that the axis of an ellipsoid is just
like the axis of a cylinder.
For an ellipsoid that isn't aligned with the coordinate axes, additional issues come into play. The orientation of the length of
the ellipsoid is given by the axis (see diagrams shown with the documentation on the box object):
myell = ellipsoid(pos=(x0,y0,z0), axis=(a,b,c), length=L, height=H, width=W)
|
The axis attribute gives a direction for the length of the ellipsoid, and the length, height, and width of the ellipsoid are
given as before (if a length attribute is not given, the length is set to the magnitude of the axis vector).
The ellipsoid object has the following attributes and default values, like those for cylinders:
pos (0,0,0),
x (0),
y(0),
z(0),
axis (1,0,0),
length (1),
color (1,1,1) which is color.white,
red (1),
green (1),
blue (1),
opacity (1),
material, and
up (0,1,0). Additional attributes, similar to those for a box:
height In the y direction in the simple case, default is 1
width In the z direction in the simple case, default is 1
size (length, height, width), default is (1,1,1)
myell.size=(20,10,12) sets length=20, height=10, width=12
Note that the
pos attribute for cylinder, arrow, cone, and pyramid corresponds to one end of the object, whereas for an
ellipsoid, box, sphere, or ring it corresponds to the center of the object.
See description of
Additional Attributes available for all 3D display objects.
faces
The "faces" primitive takes a list of triangles (position, color, and normal for each vertex). This is useful for writing
routines in Python to import 3D models made with other 3D modeling tools. You would still need to do lots of calculations of
normals and so on, but you would not need to do C coding to import an arbitrary model file.
The faces object is an array primitive (like curve, convex, etc), so you have to use a frame to move it around. It consists of a
set of one-sided triangles with user-specified vertices, colors, and normals. The pos, color, and normal attributes look like
this:
pos = [ t0v0, t0v1, t0v2,
        t1v0, t1v1, t1v2,
        t2v0, t2v1, t2v2, ... ]
|
where t0v0 is the position of vertex 0 of triangle 0, t0v1 is vertex 1 of triangle 0, etc.
Each face is a one-sided surface. Which side is illuminated is determined by the "winding" order of the face. When you are
looking at a face, it is illuminated if the order of the vertices in the
pos list goes counter-clockwise. If you need the
triangle to be visible from either side, you must create another triangle with the opposite winding order.
If you don't specify normals at the vertices, the face is illuminated only by "ambient" light. In order for the main lighting to
affect the appearance, you must specify normals to the surface at the vertices. In the simplest case, a normal at a vertex is
perpendicular to the face, and adjoining faces have a hard edge where they join. A soft edge can be produced by averaging the
normals to the two faces at their common vertices. The brightness of a face is proportional to the cosine of the angle between
the normal and the light.
If you specify different colors at the vertices of one triangular face, VPython interpolates across the face, in which case the
face is not all one color. There is a similar interpolation for normals if there are different normals at the vertices,
in which case the face is not all one brightness.
The faces object is intended to help with writing model importers and other new primitives in Python, not for direct
manipulation by normal programs. It is considerably lower-level than any of the other objects in Visual (although it is not
necessarily any faster, at least right now). It is flexible enough to implement smooth or facet shading, per-vertex coloration,
two-sided or one-sided lighting, etc, but all of these calculations must be made by the programmer (when setting up
pos,
color,
normal).
You can specify a
material, but currently you can not specify opacity for faces.
See description of
Additional Attributes available for all 3D display objects.
For examples of the use of the faces object, see the faces demo programs.
frame
Composite Objects with frame
You can group objects together to make a composite object that can be moved and rotated as though it were a single object.
Create a frame object, and associate objects with that frame:
f = frame()
cylinder(frame=f, pos=(0,0,0), radius=0.1, length=1, color=color.cyan)
sphere(frame=f, pos=(1,0,0), radius=0.2, color=color.red)
f.axis = (0,1,0)
f.pos = (-1,0,0)
|
By default, frame() has a position of (0,0,0) and axis in the x direction (1,0,0). The cylinder and sphere are created within
the frame. When any of the frame attributes are changed (pos, x, y, z, axis, or up), the composite object is reoriented and
repositioned.
You can make all the objects in a frame invisible or visible by setting the frame's visible attribute.
Another frame attribute is objects, which is a list of currently visible objects contained in the frame (the list does not
include objects that are currently invisible, not lights, which are found in scene.lights). If you want to make all the
objects in a frame be red, do the following (assume the frame is named f):
for obj in f.objects:
    obj.color = color.red
|
If you use this method to make all the objects invisible, the f.objects list will be empty. If you need a list containing all
the objects, both visible and invisible, you need to maintain your own list of objects.
If ball is an object in a frame, ball.pos is the position local to the frame, not the actual
position in "world space". Here is a routine that will calculate the position of a vector such as ball.pos in world space:
def world_space_pos(frame, local):
"""Returns the position of local in world space."""
    x_axis = norm(frame.axis)
    z_axis = norm(cross(frame.axis, frame.up))
    y_axis = norm(cross(z_axis, x_axis))
    return

frame.pos+local.x*x_axis+local.y*y_axis+local.z*z_axis
|
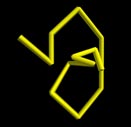
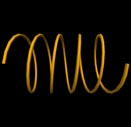
helix
The following statement will display a helix that is parallel to the x axis:
spring = helix(pos=(0,2,1), axis=(5,0,0), radius=0.5)
|
The helix object has the following attributes and default values:
pos (0,0,0),
x (0),
y(0),
z(0),
axis (1,0,0),
length (1),
radius (1),
coils (5),
thickness (radius/20),
color (1,1,1) which is color.white,
red (1),
green (1),
blue (1),
material,
and
up (0,1,0).
Note that the
pos attribute for cylinder, arrow, cone, pyramid, and helix corresponds to one end of the object,
whereas for a box, sphere, or ring it corresponds to the center of the object.
Currently it is not possible to specify the opacity of a helix object, which is based on the curve object.
See description of
Additional Attributes available for all 3D display objects.
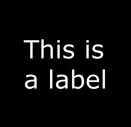
label
With the label object you can display text in a box. Here are simple examples (in the second label statement, note the standard
Python scheme for formatting numerical values, where 1.5f means 1 figure before the decimal point and 5 after):
box(pos=(0,0,0), color=color.red)
label(pos=(0,0.25,0), text='This is a box')
label(pos=(0,-0.25,0), text='pi = %1.5f' % pi)
|
There are many additional label options. In the accompanying diagram, a sphere representing the Earth (whose center is at
earth.pos) has an associated label with the text "Earth" in a box, connected to the sphere by a line which stops at the
surface of the sphere:
earthlabel = label(pos=earth.pos, text='Earth', xoffset=20, yoffset=12, space=earth.radius, height=10, border=6, font='sans')
|
A unique feature of the label object is that several attributes are given in terms of screen pixels instead of the usual
"world-space" coordinates. For example, the height of the text is given in pixels, with the result that the text remains
readable even when the sphere object is moved far away. Other pixel-oriented attributes include
xoffset,
yoffset, and
border.
Here are the label attributes:
pos;
x,
y,
z The point in world space being labeled. If there are no
offsets (see diagram), the center of the text is at
pos
xoffset,
yoffset The x and y components of the line, in pixels (see diagram). You can
left justify text by setting xoffset = 1
and line = 0 (so the 1-pixel line doesn't show), or
right-justify text by setting xoffset = -1 and line = 0.
text The text to be displayed, such as 'Earth'
(Line breaks can be included as \n, as in label.text = "Three\nlines\nof text")
font Name of the desired font; for example, 'sans', or 'serif', or 'monospace' (fixed-width)
Python Unicode strings are supported.
height Height of the font in pixels; default is 13 pixels
color,
red,
green,
blue Color of the text
opacity Opacity of the background of the box, default 0.66
(0 transparent, 1 opaque, for objects behind the box)
border Distance in pixels from the text to the surrounding box; default is 5 pixels
box 1 if the box should be drawn (default), else 0
line 1 if the line from the box to pos should be drawn (default), else 0
linecolor Color of the line and box
space World-space radius of a sphere surrounding pos,
into which the connecting line does not go
See description of
Additional Attributes available for all 3D display objects.
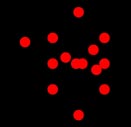
points
The points object takes a list of points for pos, like the curve object. The following statement will display two points,
each of radius 50 pixels:
points(pos=[(-1,0,0), (1,0,0)], size=50, color=color.red)
|
A new points object is similar to a curve, but with disconnected points. As with curve, the pos attribute is an array of points,
and color can also be an array. If you say
shape="round", the points are round, which is the default;
shape="square" makes
square points. The size of the points is specified by
size, and the default size is 5 (meaning a square 5 by 5, or a circular
disk bounded by a 5 by 5 square). The size attribute is in screen pixels if
size_units="pixels" (the default), but if
size_units="world", the size is in the usual coordinates. The maximum size of a point is about 50 by 50 pixels; specifying a
larger size than the maximum does not increase the size.
Lighting does not affect the appearance, which is determined solely by the color. You cannot specify a material for points,
and currently it is not possible to specify the opacity of a points object.
See description of
Additional Attributes available for all 3D display objects.
Technical caveat: size_units="world" may not work on very old video drivers which do not support OpenGL 1.4 or the
ARB_POINT_PARAMETERS extension. If you have problems, upgrade your video driver.
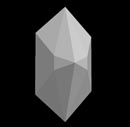
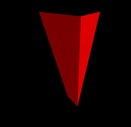
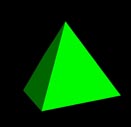
pyramid
The pyramid object has a rectangular cross section and tapers to a point. The following statement will display a pyramid with
the center of the rectangular base at (5,2,0), pointing parallel to the x axis with a base that is 6 high (in y), 4 wide (in z),
and with a length 12 from base to tip:
pyramid(pos=(5,2,0), size=(12,6,4))
|
The pyramid object has the following attributes and default values, like those for cylinders: pos which is the center of the
rectangular base (0,0,0),
x (0),
y(0),
z(0),
axis (1,0,0),
length (1),
color (1,1,1) which is color.white,
red (1),
green (1),
blue (1),
opacity (1),
material, and
up (0,1,0). Additional pyramid attributes:
height In the y direction in the simple case, default is 1
width In the z direction in the simple case, default is 1
size (length, height, width), default is (1,1,1)
mypyramid.size=(20,10,12) sets length=20, height=10, width=12
Note that the
pos attribute for cylinder, arrow, cone, and pyramid corresponds to one end of the object, whereas for a box,
sphere, or ring it corresponds to the center of the object.
See description of
Additional Attributes available for all 3D display objects.
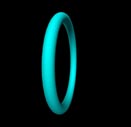
ring
The ring object is circular, with a specified radius and thickness and with its center given by the pos attribute:
ring(pos=(1,1,1), axis=(0,1,0), radius=0.5, thickness=0.1)
|
The ring object has the following attributes and default values, like those for cylinders:
pos (0,0,0),
x (0),
y(0),
z(0),
axis (1,0,0),
length (1),
color (1,1,1) which is color.white,
red (1),
green (1),
blue (1),
opacity (1),
material, and
up (0,1,0). As with cylinders, up has a subtle effect on the 3D appearance of a ring unless a non-smooth material is specified.
The
axis attribute only affects the orientation of the ring; the magnitude of the
axis attribute is irrelevant. Additional
ring attributes:
radius Radius of the central part of the ring, default = 1, so
outer radius = radius+thickness
inner radius = radius-thickness
thickness The radius of the cross section of the ring (1/10th of radius if not specified),
not the full diameter as you might expect.
Note that the
pos attribute for cylinder, arrow, cone, and pyramid corresponds to one end of the object, whereas for a ring,
sphere, and box it corresponds to the center of the object.
See description of
Additional Attributes available for all 3D display objects.
sphere
Here is an example of how to make a sphere:
ball = sphere(pos=(1,2,1), radius=0.5)
|
This produces a sphere centered at location (1,2,1) with radius = 0.5, with the current foreground color.
The sphere object has the following attributes and default values, like those for cylinders except that there is no length
attribute:
pos (0,0,0),
x (0),
y(0),
z(0),
axis (1,0,0),
color (1,1,1) which is color.white,
red (1),
green (1),
blue (1),
opacity (1),
material, and
up (0,1,0). As with cylinders,
up and
axis attributes affect the orientation of the sphere but
have only a subtle effect on appearance unless a non-smooth material is specified. The magnitude of the axis attribute is
irrelevant. Additional sphere attributes:
radius Radius of the sphere, default = 1
Note that the
pos attribute for cylinder, arrow, cone, and pyramid corresponds to one end of the object, whereas for a sphere
it corresponds to the center of the object.
See description of
Additional Attributes available for all 3D display objects.